

Cryptocurrency hardware wallets such as Ledger Nano S are secure and easy to use. They are frequently recommended for cold storage of Bitcoin and other cryptocurrencies. But is the Ledger Nano S right for you? How do you use it properly to protect your funds? And what should you be aware of to avoid getting scammed? In this Ledger tutorial, we aim to cover all these, other features of Ledger and FAQs on it. We have a lot to cover so let’s dive in!
If you are new to cryptocurrency wallets, do read our beginners guide on them first.
The Ledger Nano S Lifecycle
The following steps describe a user’s entire interaction with their Ledger Nano S hardware wallet. From areas to consider prior to buying, all the way to sending funds and monitoring your balance. Feel free to skip around to the sections most relevant to you.
| The Ledger Lifecycle |
|---|
| Deciding |
| Buying |
| Initial Checks |
| Initializing |
| Transaction Processing |
| Storage and Monitoring |
| Ledger FAQ |
Apart from covering best practices and security features of Ledger, we also provide security tips to guard against scams.
Deciding
How do you know if the Ledger Nano S is right for you? In our introduction to cryptocurrency wallets, we listed several criteria for consideration. Let’s take a look at how the Ledger Nano S satisfies each of the criteria.
| Features | Ledger Nano S |
|---|---|
| Security | Hardware wallets such as Ledger Nano S are very secure as the private keys never leave the device. They also offer many security features which we would elaborate on in this post. |
| Value of holdings vs cost | A Ledger Nano S costs USD 70 (at time of writing). Our rule of thumb is that if you own more than a week's worth of salary in crypto, you should definitely get one. |
| Ease of use | We feel that it is easy to use. Do read the remainder of our post to make an assessment for yourself. |
| Transaction amounts | Currently the Ledger Nano S does not offer full node support. When processing large sums of crypto, running a full node is advisable. |
| Usage | Long term cold storage of crypto. |
| Platform | Windows, macOS, Linux. |
| Coin support | A full list of coins supported can be found here. |
| User Reviews | On Amazon, reviews averaged 3.7 out of 5 stars. However, on the Ledger website reviews averaged 4.5 out of 5 stars. Our analysis shows that negative reviews by Amazon users were mostly about getting scammed or receiving tampered versions. As will be explained later, we believe this is due to inventory commingling at Amazon. Avoid Amazon, just buy direct from Ledger's website. Some of the negative reviews on Amazon also demonstrated a lack of understanding of intentional steps taken by ledger. For example, a one-star reviewer pointed out that the "Anti-Tampering seal was missing" and returned the product. However, this wasn't a mistake on Ledger's part. Such seals were not used as they are easily counterfeited. |
| Source code | While Ledger's applications are Open Source, it's operating system isn't. However, the latter is progressively becoming more open. |
| Other features | Advanced passphrase options to create hidden wallets. |
Overall, we find the Ledger Nano S a good crypto hardware wallet which we personally use to manage our funds. However, there are areas for improvement.
- Can’t generate new receiving addresses manually. Currently, Bitcoin receiving addresses would only change when funds are transferred into them. There is no option to generate new addresses manually. Thus, users expecting receipts from many parties cannot provide different addresses to each of them. This leads to problems associated with address reuse.
- No integrated exchanges. Trading of cryptos thus involves the extra step of sending them to an exchange.
- Limited storage capacity. Users can only install a few apps on their device. Those managing many coins have to free up space by deleting other apps before installing those they need to transact with. Ledger has stated that this is a deliberate design feature of their Secure Element chip. The limited space ensures the device’s memory is hard to access through physical attacks and cloning. However, it would be good if they could support secure external storage in future versions.
Buying
Where should you buy your Ledger hardware wallet from? You should only buy them from Ledger’s website. If this is not possible, then get it from approved retailers listed on their site. Avoid buying them from other sites. This would save you the hassle of verifying the device’s integrity since you purchased it from a trusted source.
While Ledger lists Amazon as an official store, buying from Amazon is not recommended. Even if the product description indicates “Ships from and sold by Amazon.com”, you should not buy it. The reason for this is inventory commingling, meaning your purchase could come from any one of the sellers on Amazon, not just Amazon. This exposes you to supply chain attacks where hardware wallets are manipulated before end-customers receive them.
Here is an example of what can happen if you don’t purchase from a legitimate source.
Security tips: Only buy from Ledger directly or reliable sources. Never buy from Amazon.
Initial checks
Upon receiving your Ledger device you should carry out the following checks.
1) Check the contents of the box.

It should contain the following:
- A Ledger Nano S hardware wallet;
- 3 paper cards, which includes (a) a Getting started card, (b) a Did you notice card and (c) A blank Recovery Sheet;
- A USB / micro USB cable;
- Extra accessories, such as a keychain and a lanyard; and
- Extra packaging (unmarked foam / cardboard)
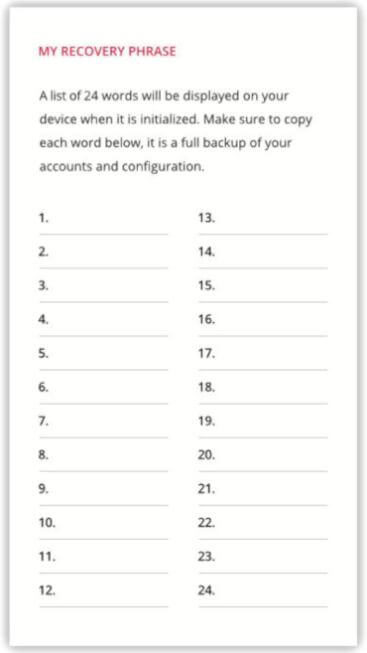
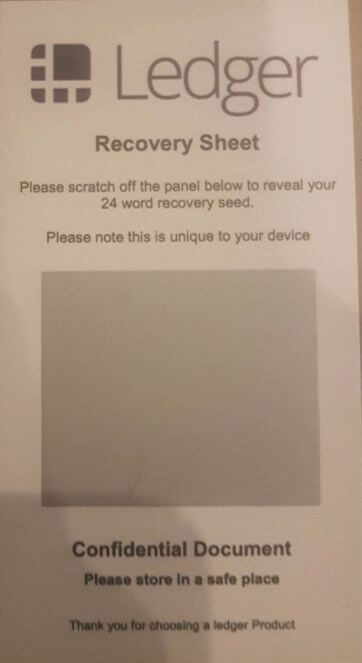
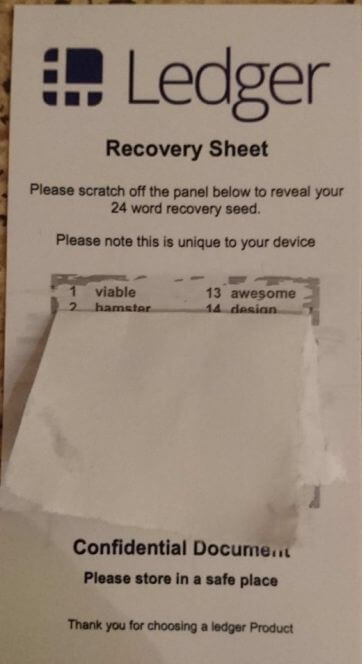
2) Check the Recovery Sheet
Ensure that your recovery sheet is blank. Ledger will never provide you with the 24-word recovery phrase. This recovery phrase acts as your mnemonic seed to generate your private and public keys. The only recovery phrase you can trust is the one coming from the screen of your Ledger hardware wallet.
Security tips: The Recovery Sheet should always be blank as shown in the picture below.
This step is crucial as it helps to avoid getting scammed. Users have received devices with an already completed Recovery Sheet. In one instance, the Recovery Sheet contained a “scratch off” paper that revealed the seed. The user then created his wallet using that seed and had his funds stolen. The scammers gained access to the user’s funds as they knew the seed on the Recovery Sheet.
Initializing
In this section, we would be discussing the Ledger wallet setup.
1) Check that the device is not pre-configured
When first booted up, the device should display Welcome and Press both buttons to begin.

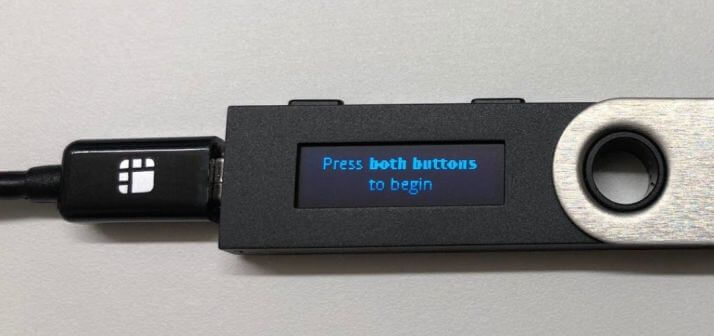
Ensure the wallet is not pre-configured with a PIN which you did you choose yourself. If you received a PIN or if the device requires a PIN not chosen by you, do not use the device. Immediately contact Ledger support for help.
2) Initialize using Ledger Live
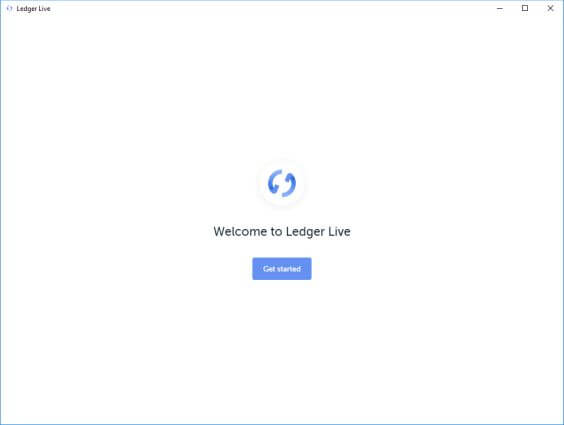
Step 1: To initialize the device, download Ledger Live which is available on Mac OS, Windows, and Linux.
Step 2: Select Get started in the screen below.
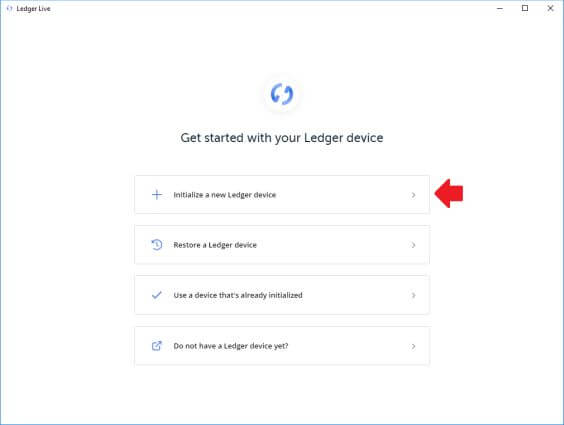
Step 3: Connect your Ledger Nano S to your computer and select Initialize a new Ledger device.
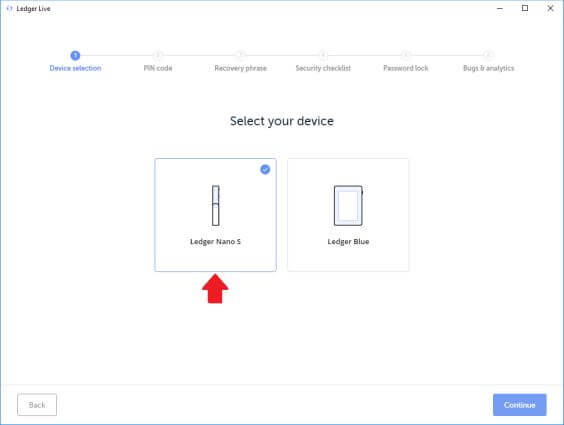
Step 4: Select Ledger Nano S as your device followed by Continue at the bottom right-hand corner.
Step 5: Select your PIN
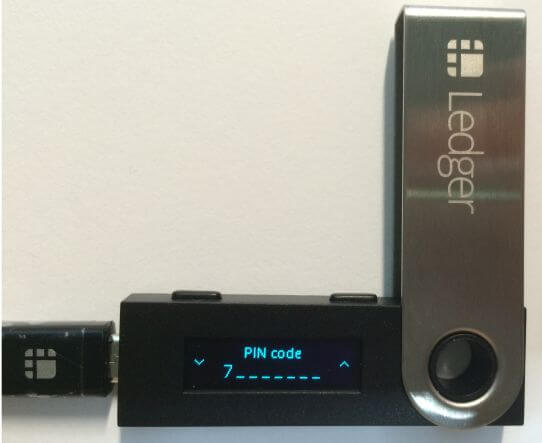
Ledger Live gives you instructions on setting up your PIN on your device. After setting your PIN, the device would ask you to re-enter your PIN. This is to ensure you have recorded it correctly. To move between numbers, press the left or right button on your hardware wallet. To select a particular number, press both buttons at the same time. After that, select Continue at the bottom right-hand corner.

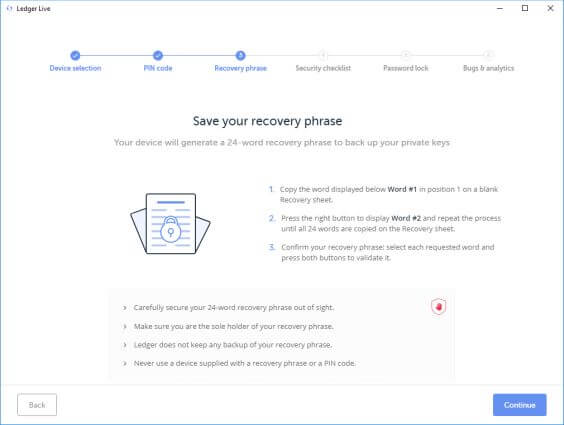
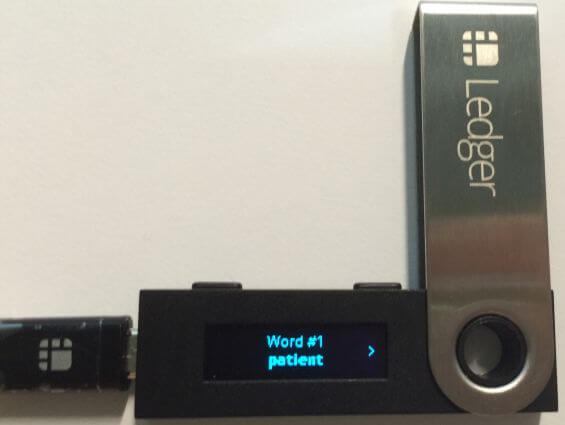
Step 6: Record your recovery phrase
Ledger Live would then ask you to record your recovery phrase that appears on your Ledger hardware wallet.
You can record this on the blank recovery sheet provided. Or, use a device such as Cryptosteel with Mnemonic letter set. Make backups of this recovery phrase and store them in separate locations. Your recovery phrase is crucial as it helps restore access to your funds if your wallet fails.
Security tips: Never take a picture of your recovery phrase or enter it into a computer in any shape or form other than to recover your wallet. And certainly, don’t upload it to the cloud.
Security tips: Be extra careful at this step, the recovery phrase is only displayed once. Ledger does not keep any backup of your recovery phrase so once lost, it is gone forever.
After recording your recovery phrase, the device would ask you to re-enter your recovery phrase. This is to ensure you have recorded it correctly.
After that, select Continue at the bottom right-hand corner.
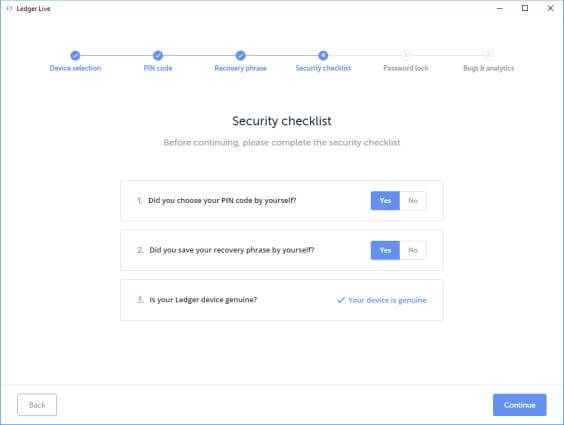
Step 6: Verify if your device is genuine
Complete the steps to verify that your device is genuine by selecting Check now. Fraudulent devices cannot interact with Ledger applications such as Ledger Live.
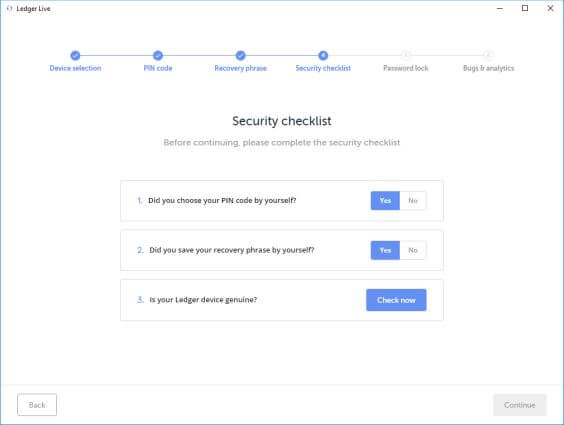
Verification steps are as follows:
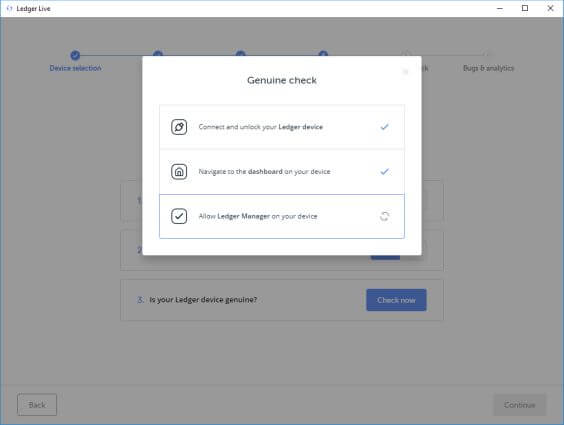
- Connect and unlock your Ledger device. This means after connecting your device to the computer, you should enter the PIN selected in Step 5 above.
- Navigate to the dashboard on your device. This means that you should be at the screen you see immediately after entering your pin.
- Allow Ledger Manager on your device. Your Ledger device would request permission to access your device. If you agree, press the right button on your device.
After verification is complete, select Continue in the bottom right-hand corner.
Step 7: Setup your Ledger Live password.
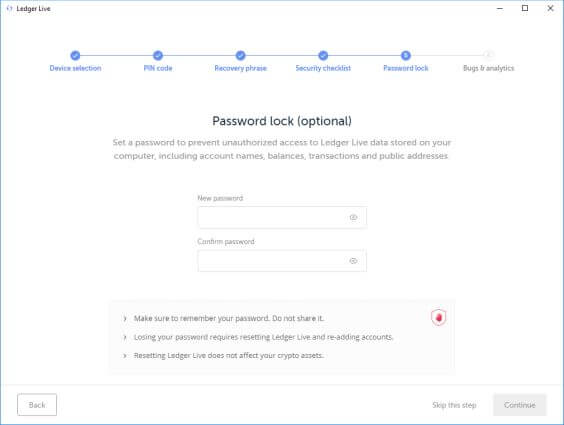
Setup a password to avoid unauthorized access to your Ledger Live account. After that select Continue.
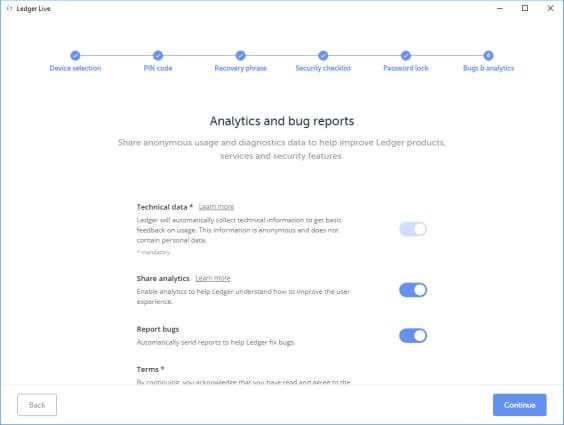
Step 8: Indicate whether you want to share information with Ledger. After that select Continue.
Step 9: Your device is ready for use!

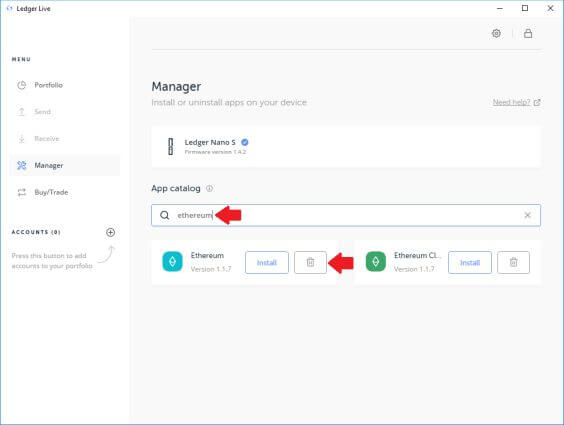
3) Download apps
Step 1: Select the Manager menu.
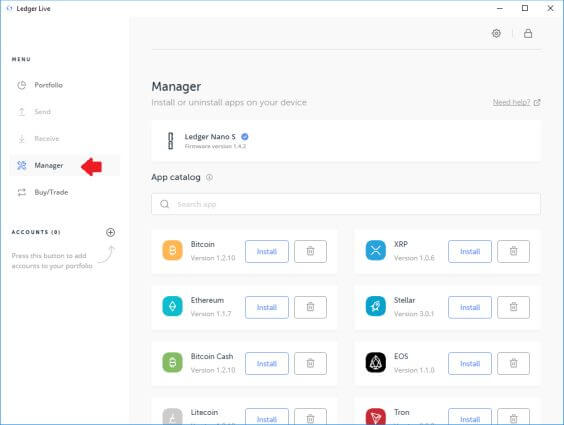
Step 2: Enter the desired cryptocurrency in the App catalog field and select Install.

Note: If you do not have space to download apps, you first need to uninstall apps. You can do so as follows.
Step 1: Navigate to the Manager menu.
Step 2: Enter the desired cryptocurrency you want to remove and select the recycle bin.
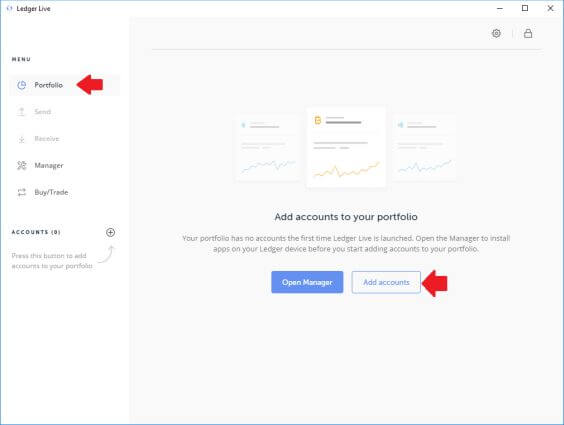
4) Add accounts for downloaded apps
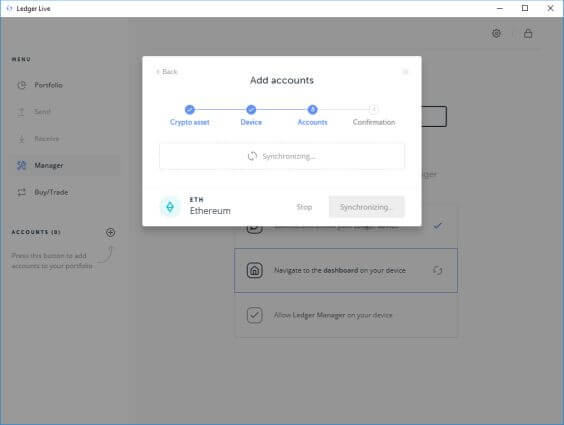
Step 1: Select Portfolio and then select Add accounts.
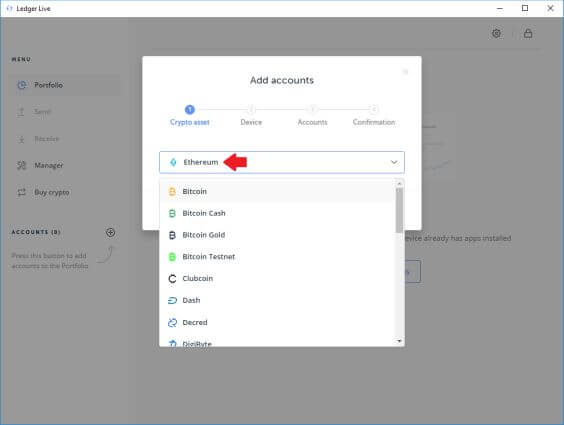
Step 2: Select the desired cryptocurrency. We have chosen Ethereum for demonstration purposes. After that select Continue.
Step 3: Connect and unlock your Ledger hardware wallet by entering your PIN.
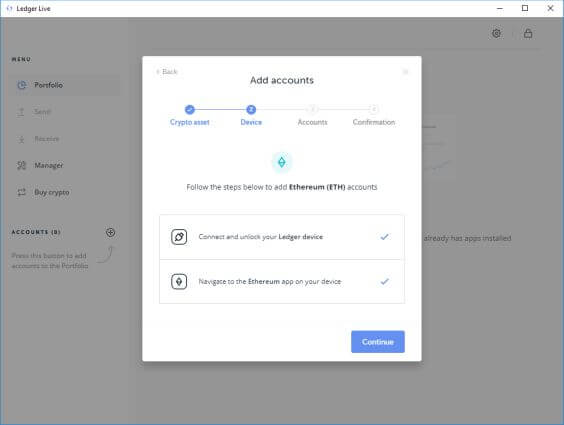
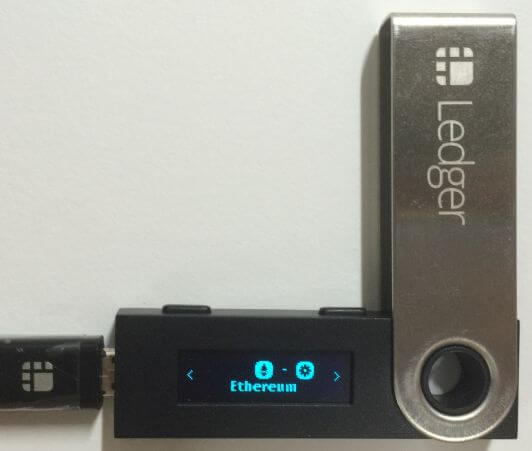
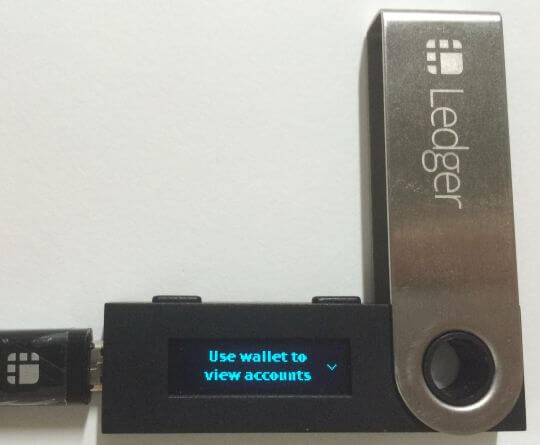
After that, open the relevant app on your device. To do so, navigate to the Ethereum app on the Ledger hardware wallet and press both left and right buttons simultaneously.
The below image an unopened Ethereum app.
Upon opening the Ethereum app, you would see the following screen.
Step 4: Ledger Live would synchronize. No action is required on your part.
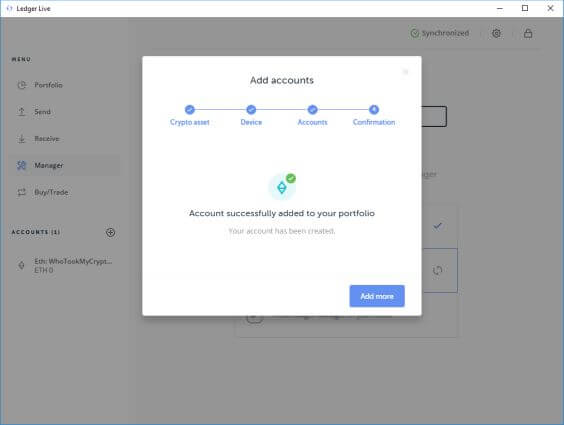
Step 5: Account successfully added.
5) Restoring your wallet
If storing significant amounts of crypto, you may wish to be extra vigilant by verifying your recovery phrase again or restoring your Ledger hardware wallet from scratch. While these processes take time, they provide you the peace of mind that you can restore your wallet if you need to. You should perform these steps before transferring any funds into your wallet.
There are two ways to go about this.
Method 1: Download Recovery Check from Ledger Live
Step 1: Select the Manager menu.

Step 2: Search for Recovery Check and select Install.
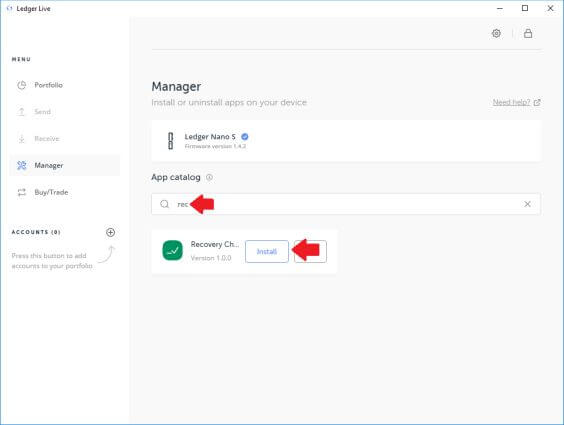
Step 3: Access Recovery Check on your Ledger hardware wallet.
Step 4: Select the number of words in your recovery phrase.

Step 5: Enter your recovery phrase on your Ledger hardware wallet.
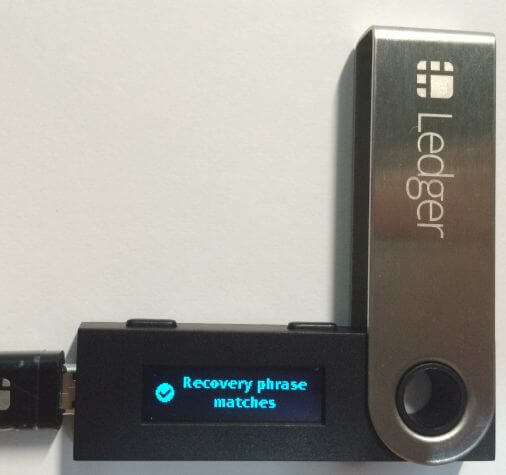
Step 6: If you see the following screen, it means your recovery phrase matches.
Method 2: Reset the device and restore from recovery phrase
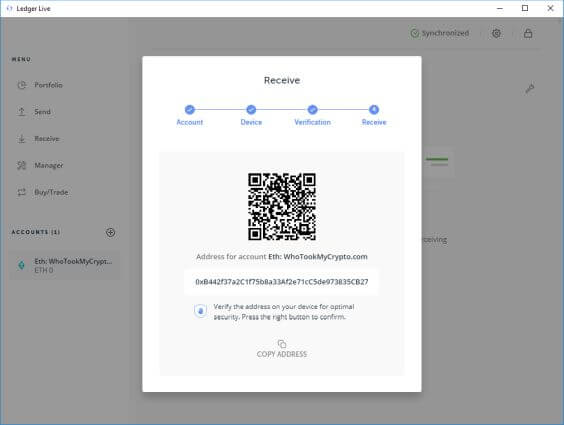
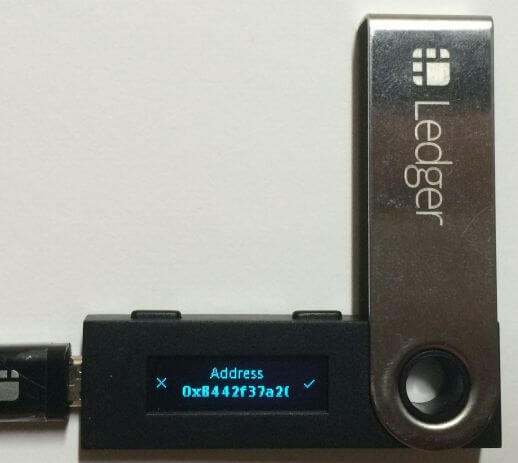
Step 1: You need to download the relevant app for your cryptocurrency. Go into the app and take note of the first receiving address. In our screenshot below, the receiving address for Ethereum is 0xB442f37a2C1f75b8a33Af2e71cC5de973835CB27.
More detailed steps on how to perform this procedure is covered in the Receiving Funds section of Transaction Processing.
Step 2: On your device, go to Settings Device Reset All
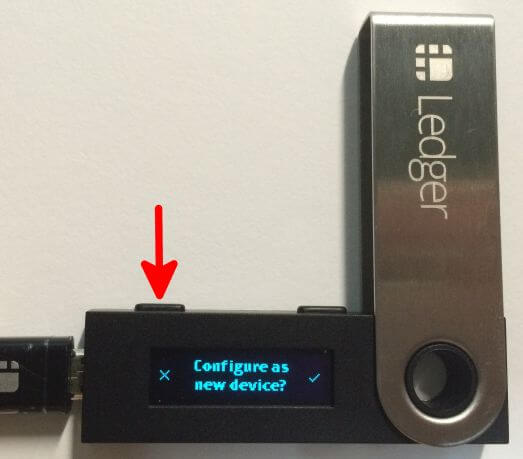
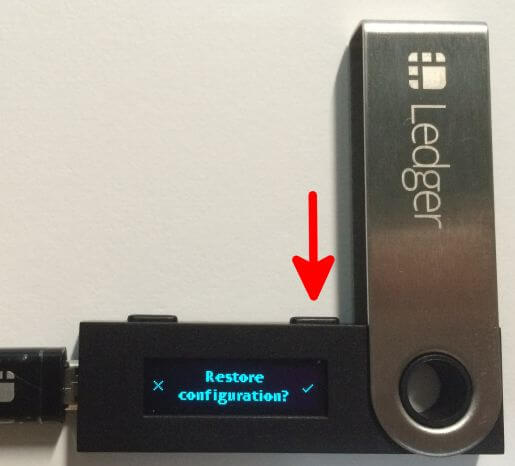
Step 3: The device would ask you to confirm whether you want to continue. To proceed, press the right button on your Ledger device to select the tick sign.

Step 4: When asked to configure as new device, indicate no by pressing the left button on your Ledger device.
Step 5: When asked to restore configuration, indicate yes by pressing the right button on your Ledger device.
Step 6: You would be asked to set your PIN code and reconfirm it. This pin does not need to be the same as what you selected previously.
Step 7: Select the number of words your recovery phrase has and proceed to enter them.

Step 8: If you see the following screen, it means your account has been successfully restored.

However, this does not mean the correct wallet has been restored. You still need to install the relevant app you worked with in Step 1, which is Ethereum in our case, and check the receiving address matches. In other words, it should be 0xB442f37a2C1f75b8a33Af2e71cC5de973835CB27
Transaction processing
Now that your wallet has been set up it is time to start sending and receiving funds.
Security tips: Transactions on the blockchain are irreversible. So exercise extreme caution when carrying them out. Learn more about precautions to take when transacting on the blockchain here.
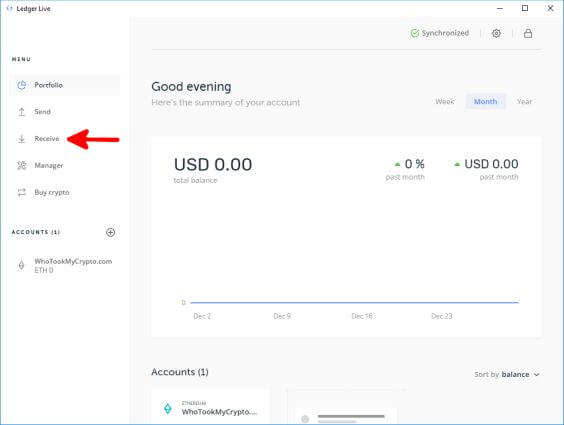
1) Receiving funds
Step 1: Select the Receive button.
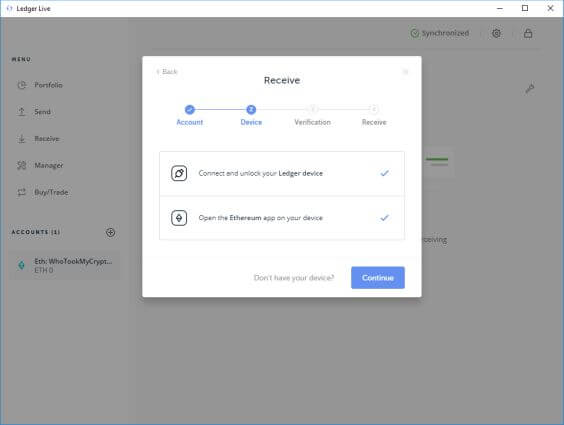
Step 2: Select the cryptocurrency you would like to receive.

Step 3: Connect and unlock your ledger device by entering your PIN. After that open the relevant app on your device. For screenshots on completing this procedure, refer to Step 3 of the Add accounts for downloaded apps procedure.
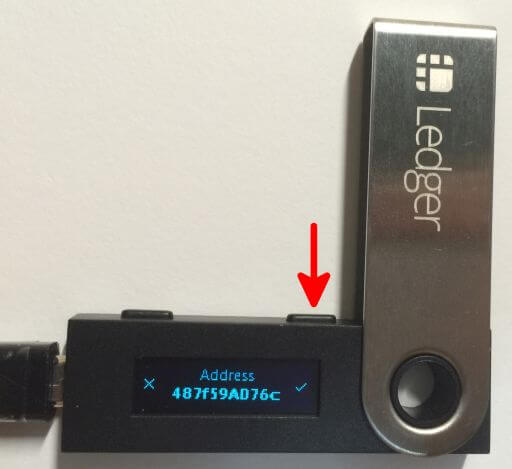
Step 4: Select Verify at this screen.

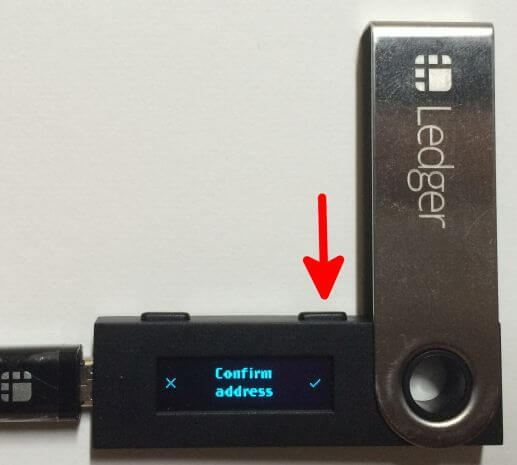
Step 5: An address would show up on your Ledger device. Ensure the address shown on Ledger Live matches that shown on the Ledger device. If it matches, select the right button on your hardware device. If it does not, press the left button and contact Ledger support as you may be subject to a malware attack.
You may then select the Copy Address button and provide your address to your sender.

Security tips: Check that the address you are providing the sender is same as that shown on your device. This is to guard against malware that can alter the address you are copying and pasting for your recipient.
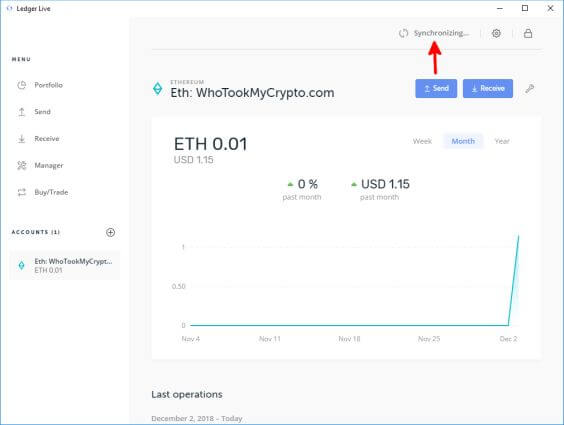
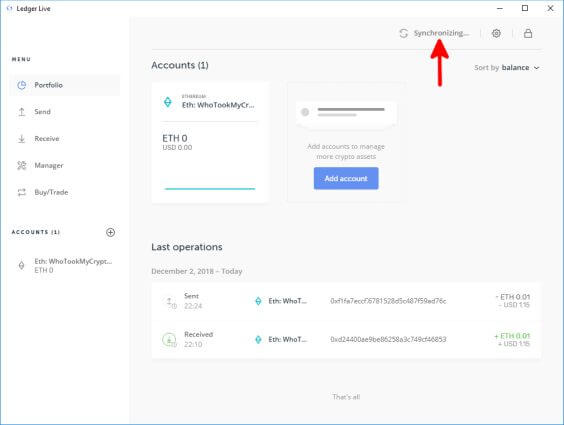
Step 7: To check receipt of funds, select Synchronize to update your wallet.
2) Sending funds
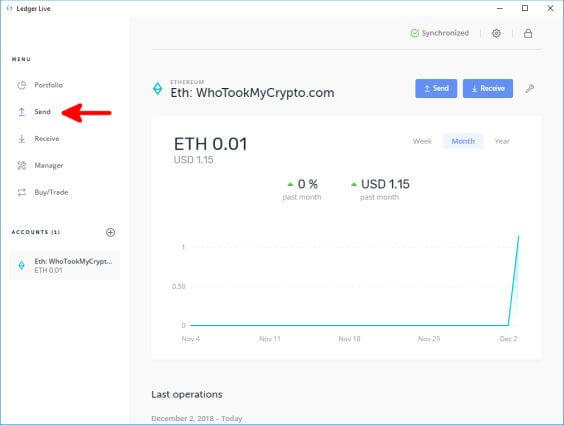
Step 1: Select the Send button in Menu.
Step 2: Fill in the relevant details such as the recipient’s address, amount and fees. After that, select Continue.

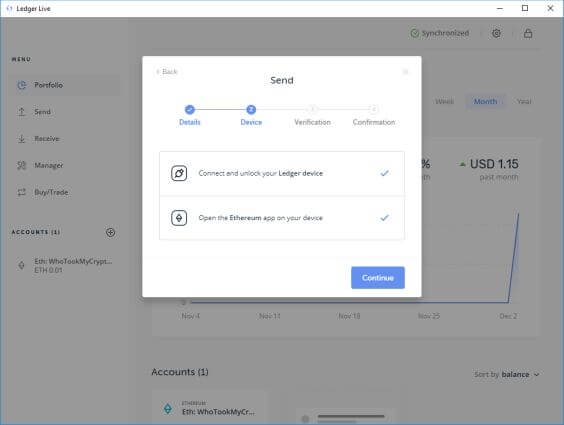
Step 3: Connect and unlock your ledger device and open the relevant app on your device. For screenshots on completing this procedure, refer to Step 3 of the Add accounts for downloaded apps procedure.
Step 4: On your Ledger device, confirm that the address you are sending to is correct. If it matches, press the right button on your device. If it does not match, press the left button on your device and contact Ledger support for help.
Step 5: View details of your operation.
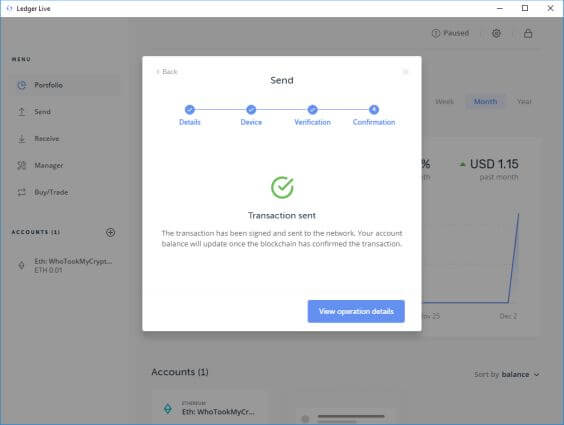

Step 6: Select Synchronize to update funds.
Storage, Monitoring, and Others
When your Ledger Nano S is not in use, you should store it in a safe place. Also, since you are your own bank, you should have a means for monitoring your balance.
1) Storage
Since hardware wallets are mostly for cold storage, chances are you do not need regular access to them. If so, find a secure place to lock them up.
2) Monitoring
Instead of accessing your Ledger Nano S each time you need to check your balance. You can instead setup watch-only wallets on devices such as iPhone, Windows, and Android.
4) Setting up plausible deniability
Ledger has a function that allows you to set up multiple wallets on the same device. This feature is useful if someone coerces you into revealing your holdings. You can open up the wallet with smaller amounts while concealing your main holdings.
To illustrate:
| Passphrase | Purpose | Funds |
|---|---|---|
| hardpassphrasetough1 | Decoy wallet | 0.05 BTC |
| hardestpassphrasetough2 | Main stash | 1,000 BTC |
Ledger allows up to two permanent wallets and one hidden wallet. Read more about it here.
To protect yourself even better, do not disclose to anyone that you own bitcoin or other cryptocurrencies.
Ledger FAQ
Question: If I uninstall an app, do I lose my crypto?
Answer: No. If you reinstall the app subsequently, you would regain access to your crypto.
Question: What happens if Ledger goes bankrupt? Do I lose my funds?
Answer: No. You can import your recovery phrase into a compatible wallet to regain access to your funds. The process is like Method 2 under the section on Restoring your wallet we discussed above. The difference is that you are doing it with a different but compatible wallet. Ledger maintains a list of compatible wallets on their site.
Question: Does restoring a wallet from a recovery phrase always get me back my crypto?
Answer: Yes. If your funds have not been stolen, this would always be the case.
Question: What kind of protection does Ledger offer?
Answer: Hardware wallets are very secure since your private keys never leave the device. Your device signs transactions within it and only transmits out the final output (and never your seed or private key).
Ledger also offers a multitude of security features. These are best explained by them in the following links:
Question: Why does Ledger Live only support certain coins?
Answer: Ledger Nano S does not support all coins natively. For example, support for Ethereum tokens (ERC20) is through third-party applications like MyEtherWallet.
Question: What coins does Ledger Nano S support?
Answer: View the list of supported coins here.
Question: When would Ledger support my coin?
Answer: You can view their roadmap here.
Question: If I restore my seed on another wallet, do I lose funds in my previous wallet?
Answer: No. Your crypto is stored on the blockchain and not on any wallet. Your wallet stores the keys that grant you access to your crypto on the blockchain.
Question: Can I have two ledgers with the same recovery phrase?
Answer: Applying the logic of the response to the previous question, yes it is possible. This is like storing your keys in two separate places.
Question: What happens if I lose my seed/recovery phrase?
Answer: Your funds are gone. If you still have access to your funds, transfer them to another wallet immediately.
Question: Why does my receiving address keep changing? Will funds sent to older addresses be received?
Answer: Rotating addresses helps avoid the risks associated with address reuse. Funds sent to older addresses will still be received. Note that rotating addresses do not apply to all cryptocurrencies. For example, as Ethereum is built differently, having rotating addresses would only complicate transaction processing. Thus, most Ethereum wallets only have a single receiving address.
Question: I previously checked that my device was genuine but it now shows me “MCU firmware is not genuine”. Is this a problem?
Answer: This message appears as the Secure Element chip has detected an anomaly with the MCU. The MCU is a chip that controls the buttons and screen of your Ledger device. Sometimes this error message can appear even if the MCU chip is functioning due to poor USB cable connection or faulty network connectivity.
To verify this is a false positive, disconnect and reconnect the device. If the message does not show up again, everything is fine.
Question: Should I get more than one Ledger Nano S?
Answer: There are many reasons to get another hardware wallet such as:
1. Having a backup device. What happens if one of your hardware wallets stops working?
2. Sharing a joint account with someone. Having two wallets grants both of you access to the same funds.
3. For convenience. You may want to keep one at work and use the other at home.
4. Small Ledger storage space. For those managing many different cryptocurrencies, getting multiple wallets is useful. This avoids the need to uninstall and reinstall different cryptocurrency apps to manage them.